If you have decided against purchasing a completed van (either new or used) and prefer to build it yourself you shouldn’t try to reinvent the wheel. There are many resources (like this website and others) that provide inspiration, education, and products meant to help. You do not need to have any specific skills (you can learn as you go)–only curiosity and a good work ethic are required.
Start by analyzing what you are trying to accomplish to ensure you don’t end up with a tool that doesn’t meet your needs. If you need to keep bikes secure then rear garage and proper bed height are necessary. If you intend on spending weeks or months in the van and travel mostly on paved roads, the build will probably need a shower and toilet. However, if your use is more like 2-3 days and involves rutted out forest roads or even off-road travel then a shorter van with less roof height and a lightweight build might make more sense.
Purchasing a van before considering your specific needs or installing cabinets before considering the height of your bed are costly mistakes. Hours spend planning, designing, and preparing will save money and time. You can see that imagining your use case will lead to different vehicle platforms and internal build outs. Staying organized and thoughtful will keep you on time, on budget, and result in a vehicle that serves your needs.
There is a proper order to a good build.
The process looks like this:
- Get Organized
- Specification Requirements
- Design a floor plan
- Purchase a van
- Create a workspace
- Order parts and materials
- Prep the van
- Cut holes and install vents & windows
- Heating and Ventilation
- Flooring Install
- Wiring
- Wall, Cabinets, and Bed Framing
- Appliances
- Insulation
- Wall Paneling
Contents
Get Organized
Project Management involves setting requirements, estimating time and cost, sourcing materials, and scheduling. This helps you stay organized, on time, and on budget.
Work area
You don’t need much. Many people have built camper-vans in their driveways (although this slows down progress due to weather restraints and having to constantly move tools / clean up every day). A garage that fits the van would obviously allow a more consistent work schedule and efficient tool/parts storage & use. This project will take months, so its worth the effort to rent a garage space if you can.
Tools
The majority of the tools are basic and you may already have them. There are some speciality tools for plumbing, electrical, or metal work. Expect to spend 1-3K for tools if you are starting from zero. You don’t need fancy brands, but don’t be cheap.
For a full recommended list click here.
Time and Cost
Professional builders generally spend between 250 and 350 man hours for a basic build (and 500+ for extreme builds). This is with a covered work area (garage), standard designs, many parts in stock, and experienced labor.
It will likely take you (much) longer.
You are not a professional builder and if you are not building from a kit or mostly prefab parts then you will spend considerable time with design, engineering, and fabrication work, including hours and hours watching YouTube videos, browsing forums, and reading articles (like this one).
There are a few different levels of camper van build methods ranging from using pre fabricated parts to full custom (buying raw material and designing and fabricating major parts from scratch), or a mix. For more on this, see the article Should I buy or Build a Campervan?.
Specification Requirements
Think about what problem you are trying to solve. Consider livability, typical trip length, cooking and food storage requirements, driving/parking characteristics, paved vs off-road use, seating & sleeping capacity, electric power needs, gear (bike/ski/surf) storage, and of course your budget.
The result of these considerations and more will determine the van chassis, body size, floor plan, electric system, appliances, etc. Spend a lot of time here. You do not want to build a van that doesn’t meet your needs.
Design a floor plan
How many passengers (seat belts and bed space) will you carry? Do you need space to “hang-out” inside after a wet ski day or just cots and gear storage? What storage requirements do you have? Look at common layouts for inspiration and note the required van size.
Consider your requirements and use social media for inspiration. A common design is a bed platform at the rear, a “garage” under the bed with utility (water/electric) cabinets on either side over the wheel wells (to better distribute the weight), and a galley towards the front. Swivel seats allow for more usability. You can choose very complicated designs that feel like an apartment or utilitarian builds that exult simplicity.
Purchase a van
The principle considerations are size (length, height, and weight rating), fuel type (diesel or gas), drive type (AWD, 4WD, 2WD), brand, cost, and availability.
Vans come in different sizes (length and height), carrying capacity (both volume and weight). Larger vans offer more living space but are more expensive, harder to maneuver, and perform worse off-road.
Generally their are four configurations consisting of high or low roof and short or long wheelbase (there are also super extended, super high roof, and some model years have 3 lengths).
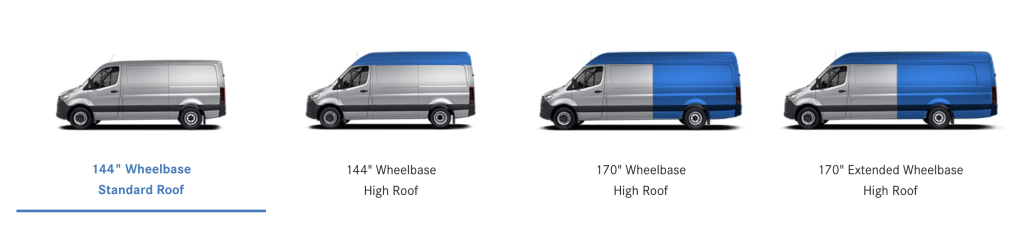
Consider your desired layout. Drive a few vans to get a feel for their size and handling characteristics.
Most people will find themselves in the middle of the pack, with a high roof (that allows you to stand up inside) and a short or medium length offering enough livability without impacting ease of driving. Certain use cases demand more extreme choices with super extended lengths or even low roof builds.
Most people can make do with 2 wheel drive (even skiers, with proper tires and traction devices). AWD/4WD is a nice to have if you can afford it.
Everyone has a preferred brand and it’s difficult to objectively recommend one over another. The Mercedes and Ford vans are the most popular platforms for a reason. Mercedes is generally more expensive to purchase and maintain. Go drive them and see which you prefer.
Create a workspace
You need a space to work in and tools to do the job. It doesn’t have to be much (a single car garage and a cheap workbench will do) but if you are trying to build in a parking lot or lack basic tools it will greatly extend your build time and frustration. Find space, acquire the basic tools, and get organized.
Purchase materials
You will be buying plywood, insulation, fasteners, sealants, flooring, appliances, electrical components, and more. You can do this all at once, or purchase them in line with your build schedule enabling you to look for deals and avoid storage costs.
You don’t need to build everything from scratch.
There are kits for cabinetry, electrical systems, wall panels, and much more. Deciding what to do yourself and what to outsource or buy as a kit involves considering the value of your time and your willingness to learn new skills. Generally speaking if you are building the van yourself you are already spending considerable time managing the project and should try to construct as much of it as possible on your own. The more you outsource individual systems the more sense it makes to simply buy a completed van. That said, certain installs like the diesel heater or electrical system can be scary and are easily outsourced.
Prep the Van
If you purchased a used van you should remove any existing shelving, flooring, or unwanted components. Clean the floor and walls removing contaminants like dust and oils. Patch any unwanted holes and treat any exposed metal with anti rust spray.
Cut Holes
Several components in the van require holes to be cut in the sheet metal. This may include the vent fan, windows, shore power, and water drain. This is a scary step but doing it now will make it easier to place wiring, insulation, and wall paneling.

Floor
The floor system should offer insulation, durability, and a level surface to rest cabinets, gear, and people. It generally consists of an insulation layer (polystyrene and/or Thinnsulate) , 1/2” marine plywood, and flooring (PVC, vinyl, or marine). The idea is to maximize durability and insulation, minimize weight and cost, while meeting your aesthetic tastes.

Wiring
Your specification requirements details your required power system. You need to properly connect the components and lay wire for power distribution.
Even if you are using an all in one battery generator, wiring a DC fuse block to the unit will allow you to power your basic DC needs.
You should have a conceptual diagram that shows how all the components work together.

Insulation
The principle material choices for insulation are Thinsulate, Minicell, Polystyrene foam board, expanding spray foam, and wool. There are many factors that affect heat transfer and ideal insulation method is a surprisingly technical discussion. Look for a guide from us soon.

Cabinets and Bed
You can build cabinet and bed components out of wood, aluminum, steel, or fabric. You should consider cost, weight, and usability. For lower cabinets 8020 Extruded Aluminum is available with connectors that make it easy to assemble. This is a lightweight, strong, but expensive option. Wood is affordable but heavy. Fabric, being cheap and light, works great for upper clothing cabinets.

HVAC
Windows offer passive ventilation. Passenger vans already have them but cargo vans frequently require you to install your own (this seems scary but isn’t that hard). You will need to make a template for the hole, cut the metal, and fit the window using a sealant.
You will need more than windows to control airflow — not just for temperature control but to evacuate moist air (produced by your breath and cooking). This prevents condensation and mold growth. The absolute minimum is a 12V vent fan mounted through the roof. The installation process is similar to a window.

Heating is most commonly accomplished by using a diesel/gas heater. The units require power for the fan, ignition, and controller. Installation involves cutting a hole in the fan floor, connecting a fuel line, and wiring power.

Espar and Webasto are the most popular brands, although there are cheaper versions available. Wood stoves create a nice vibe, offer dry heat, and are very cheap but take up more space and are less convenient to operate.
Installed air-conditioning is an expensive feature both for the unit itself (3,000-5,000 dollars) and also the larger house battery system required to power it (easily adding 5,000 – 10,000$ to your electrical system cost). Other options include less powerful portable units and evaporator coolers. Consider making do with just the ceiling vent fan and a lighter colored van that reflections more radiation.
Plumbing
You want storage (tanks), distribution (pump and water lines), filtration, and fixtures like a faucet and shower head. Some expensive builds have large capacity tanks, heated indoor showers, and grey water systems ($800-3,000). But you can add basic sink/shower functionality with a simple PVC storage pipe, gravity fed water line, and a drain hole ($100-300).
Walls
Some choose to install wall paneling earlier in the build process, before cabinetry (if you prefer walls behind your cabinets). We believe cabinets, beds, and other load bearing components should be installed directly to the steel van structure. For this reason, wall paneling is generally the last step to completing the major work for your build.

Congrats, your done!
Not really though.